September 29 was the day of the Fortitude Group's convention. It was a truly memorable day and I can't even describe the joy I felt finally spending time together with all the colleagues who work scattered around Italy (and whom I usually see only through a monitor).
But let's go back a bit, to two weeks earlier to be precise, when the email from HR with the official agenda for the convention arrived.
The desire to see each other and do something together is always huge, and after looking at the schedule, we realized that there was a 3-hour "free time" slot with an asterisk next to it that said "Possibility of using the pools and the volleyball, soccer and table tennis facilities". Within minutes after receiving the email I got a message from Luigi proposing to arrange teams and matches for the respective sports.
The next day, things have already gotten out of hand and together with Gabri we decide to organize something more complex:
the Fortigames! A two-hour challenge between two teams that will compete simultaneously playing soccer, volleyball and table tennis.
To make the event more interesting, we decided to name both teams. After brainstorming, we opted for the symbol of Yin and Yang because of the classic black and white T-shirts. With a little more creativity, we decided on Tigers (Yin) versus Dragons (Yang)!
More info about Yin and Yang / Tigers and Dragons
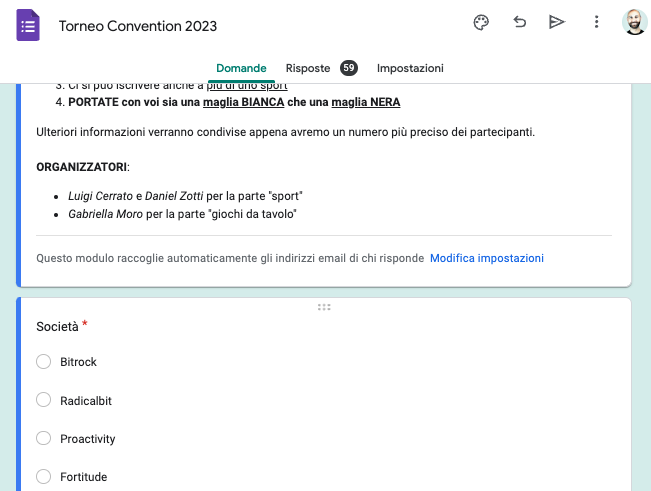
We create a form on Google Forms to collect participants data and at the same time, ask the HR team for the full list of convention attendees with their company info and emails.
That being said, you may ask, "isn't Daniel's blog usually filled with technical posts?" You are right! In fact, after this preamble, I'll take you to a week before the event, specifically Friday, September 22.
Out of the blue, Gabri comes up with the idea of developing a convention "companion" app, mostly focusing on the Fortigames and convenient for managing the results and helping attendees figure out where to go, what to do, etc.
Initially we think it's a joke; making an app from scratch in less than a week, especially working in our spare time, is unthinkable. But then Stefano joins in as well, and he proposes to use some technology never tried before, and I couldn't resist.
So we decide to develop a PWA using the following technologies:
On Friday night, I already started creating the project on the Supabase website and installing Qwik, with its plugin for Supabase.
npm create qwik@latest

npm install @supabase/supabase-js supabase-auth-helpers-qwik
Activate authentication via Google from the Fortigames project on the Supabase dashboard
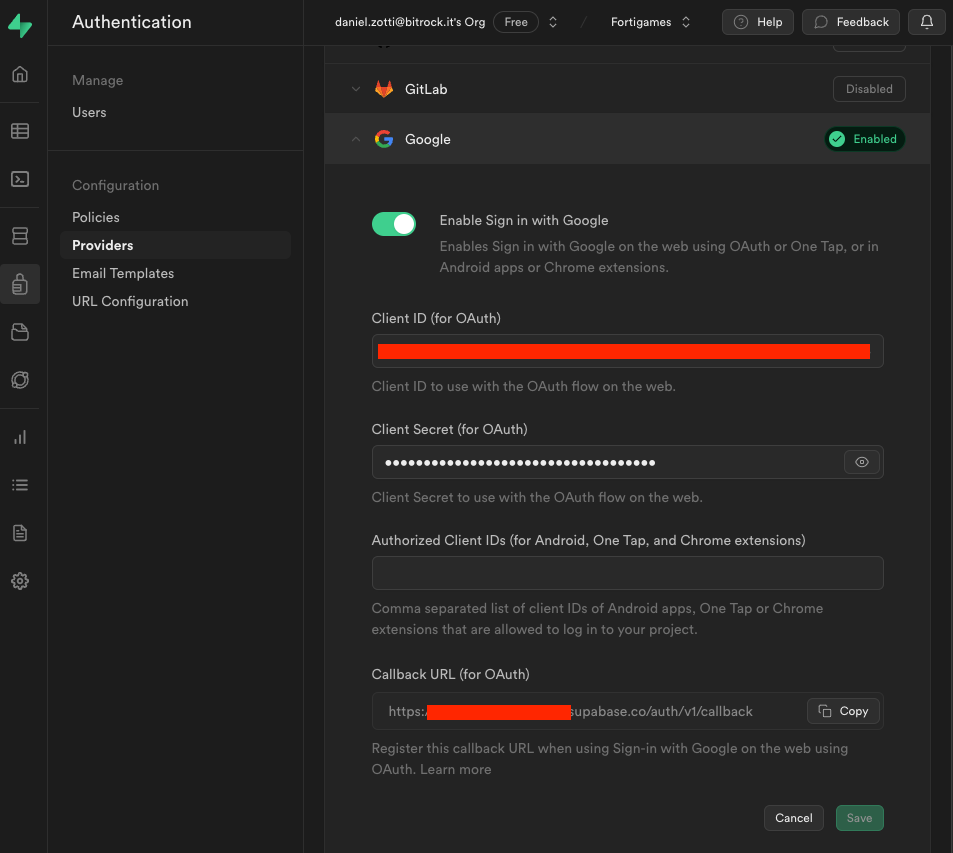
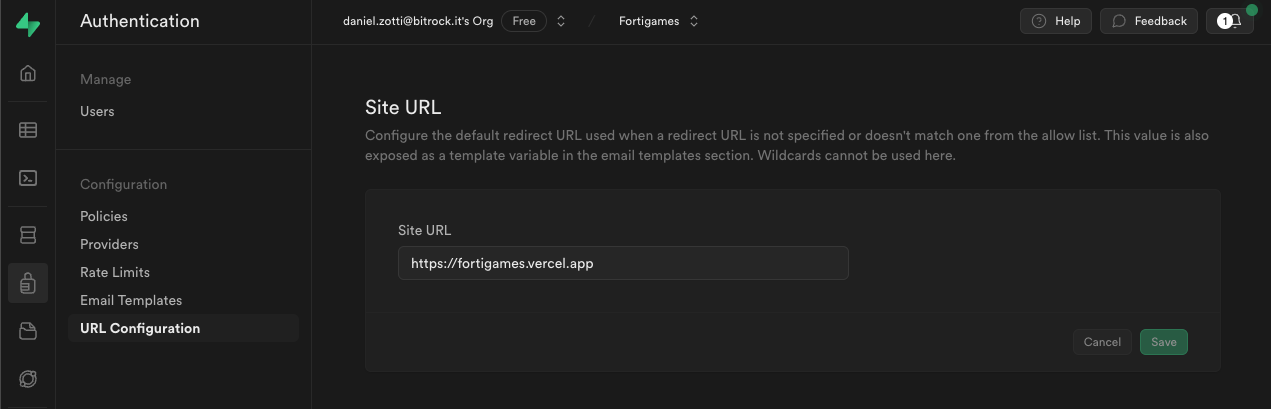
set the return url for the provider
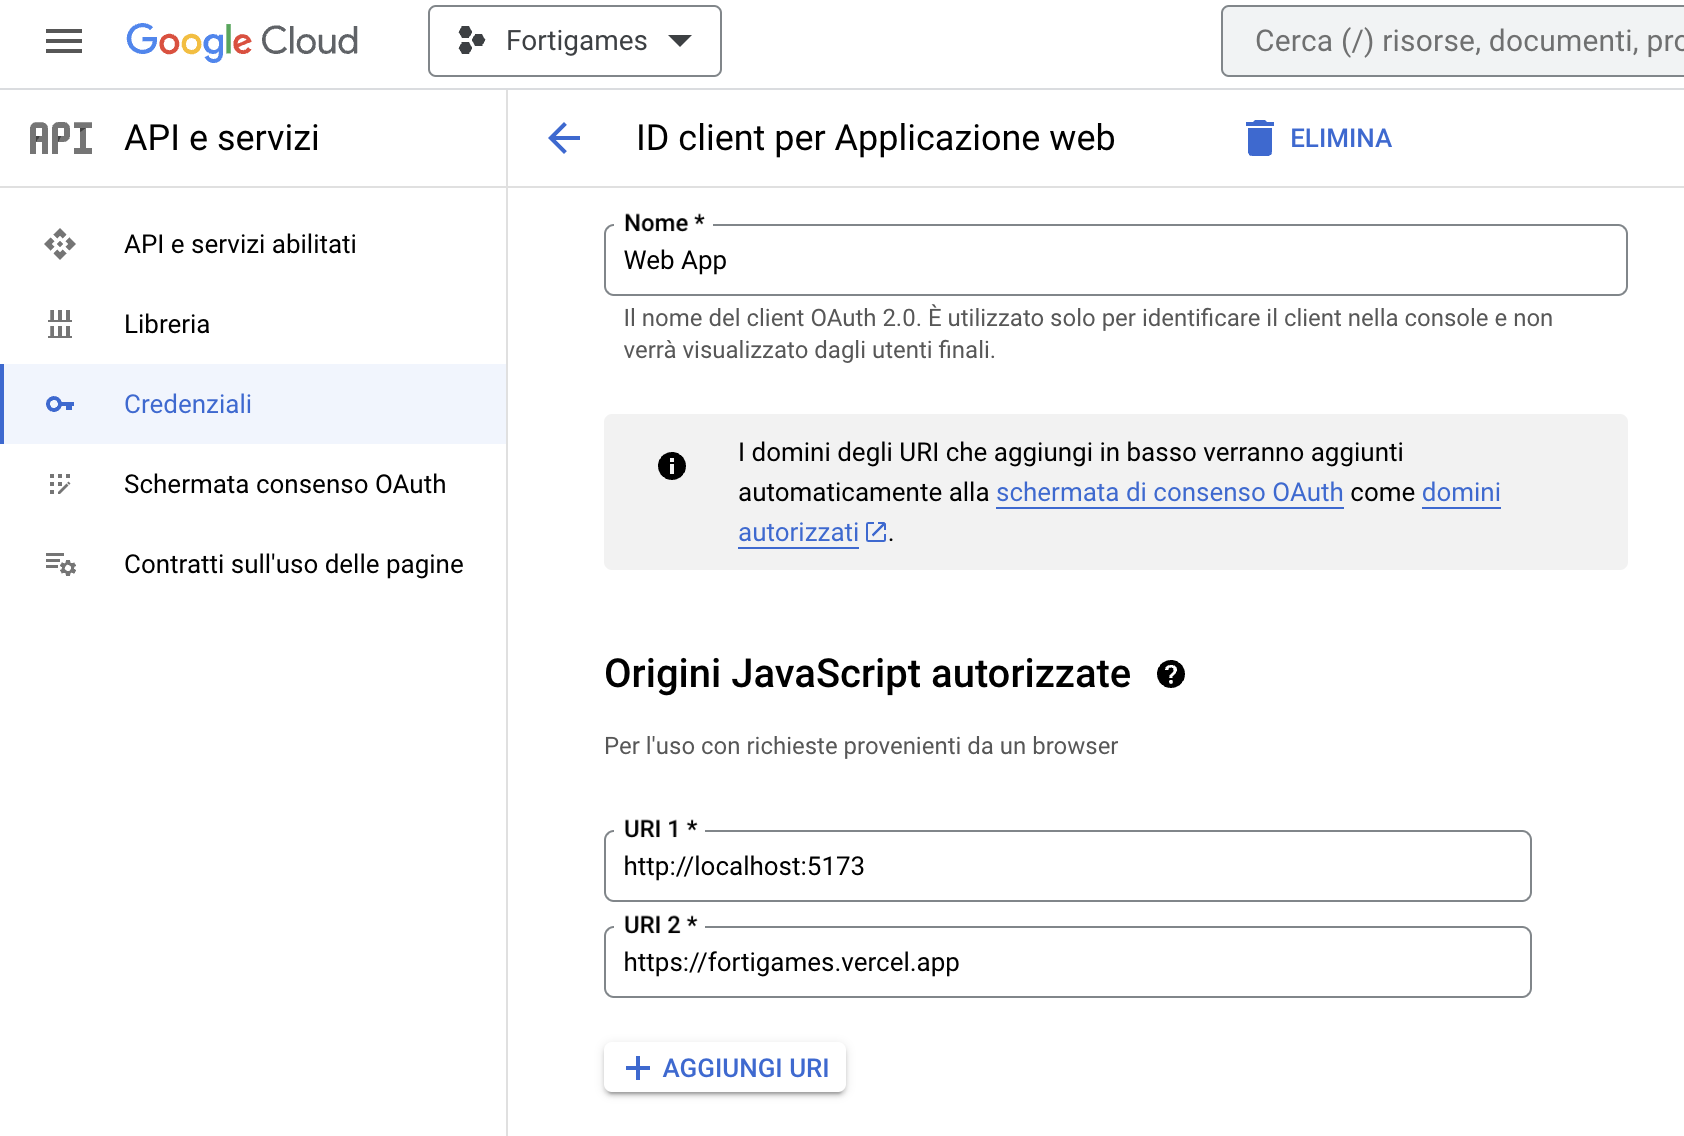
and create the web app on Google Cloud (with the correct return URL)
To log the user in, simply create a button that, when clicked, calls Supabase's createClient function by setting:
Google as the providerSupabase does the rest (it basically takes care of reading the token data from the URL and saving it to the localStorage)
// /src/components/auth/login/login.tsx

export const Login = component$(() => {
  const location = useLocation();

  const handleGoogleLogin = $(async () => {
    createClient<Database>(
      import.meta.env.PUBLIC_SUPABASE_URL || '',
      import.meta.env.PUBLIC_SUPABASE_ANON_KEY || ''
    ).auth
      .signInWithOAuth({
        provider: 'google',
        options: {
          redirectTo: location.url.origin + config.urls.auth
        }
      });
  });

  return <Button onClick$={handleGoogleLogin}> Login with Google </Button>;
});
We agree to meet Saturday morning at 9am to start jotting down ideas and talk about graphics and features.
The very first app wireframe:
After reasoning about the features, we begin from the creation of the DB directly on the Supabase website. Having little time, we try to simplify the structure a bit so as to speed up the work.
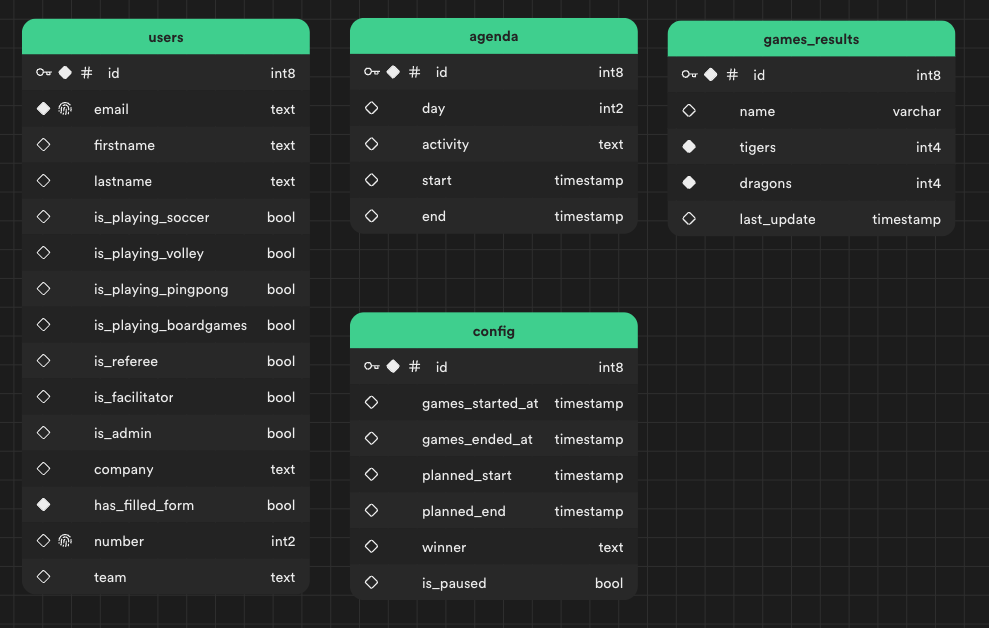
List of users who can access the app.
The day's agenda information. Each row corresponds to a task and has a beginning and an ending time.
The information about the results of the various games. Each row corresponds to the result of a specific sport (soccer, volleyball, and table_tennis)
The information about the status of the games: planned start/end time, actual start/end time, a flag to manage the paused game (e.g., bad weather or not plannable problems) and, of course, the name of the winner!
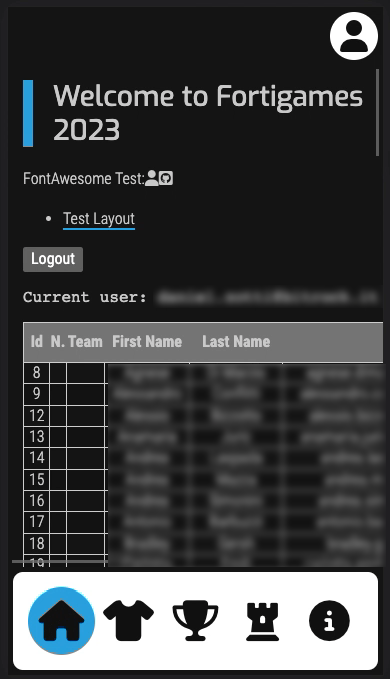
We didn't think about a desktop version (or at least totally responsive) so as to speed up the work. From the usual "mobile first" approach, you could say that we switched to a more simple approach that I would call "mobile only" 😀 (basically we put a max-width and handled responsive only for smartphones and tablets, without revising the page structure).
This is how the very first working version of the app looked like.
To speed up the work, we used the SCSS files from the danielzotti.it website.
The reasons are as follows:
The structure is as follows and each file has its own purpose:
h1,..., h6, p, a, ul, code.table-container to handle overflow of tables)@import of the various fonts usedspacing, html-max-width, ...@media() does not support css variables yet, so we had to keep the SCSS variables to use them in that context)Around 3pm we get to the point where:
The developer experience of Supabase is really nice. In addition to the well-written documentation and useful SDK, there is also a cli to make life easier for developers.
To use it, just install it
npm i supabase --save-dev
generate a personal access token.
and login
supabase login
And for those who, like me, love working with TypeScript, the cli provides a feature to automatically generate DB types:
supabase gen types typescript --project-id {project_id} > src/types/database.types.ts
Supabase has the ability to manage policies within the DB, but time is short and there is no ready method for filtering authenticated users by domain, so we decide to go the easy way and filter users client-side only, simply checking to see if they are in the users table.
Supabase handles the authentication through Google easily, but maintaining the session is the responsibility of the app developer.
In fact, reading the user's data from the localStorage every time causing bad performances and, in addition, there is no way (or we didn't find it) to figure out when the JWT token is actually saved in the localStorage and can finally be read and saved in memory. Initially, we used the good old setTimeout of 500ms but of course it became even less performant because we had to wait for the timeout each time we needed to read it.
As a result, we decided to manually handle saving the data in the localStorage.
The flow is as follows:
Login button./auth page that will take care of reading the token from the URL parameterslocalStorageuseAuth hook) so that we can directly use the context and not the localStorage as the data source (single source of truth)What happens if we reload the page (after successfully logging in)?
useCheckSession() hook on the layout that encapsulates all protected pages and returns the sessionuseCheckSession internally checks if the context existslocalStorage// /src/hooks/useCheckSession.ts export function useCheckSession() { const navigate = useNavigate(); const { auth } = useAuth(); const isTokenExpired = $(({ expires_at }: AuthSession) => { if (!expires_at) { return false; } return new Date() >= new Date(expires_at * 1000); }); const getSessionFromLocalStorage = $(async () => { try { const tokenString = localStorage.getItem(config.jwtTokenLocalStorageName); if (!tokenString) { return null; } const token: AuthSession = JSON.parse(tokenString); if (await isTokenExpired(token)) { return null; } return token; } catch (e) { return null; } }); useVisibleTask$(async () => { if (auth.value) { return; } const token = await getSessionFromLocalStorage(); if (!token) { navigate(config.urls.login); return; } auth.value = token; }); return auth; }
NB: One thing that is not immediate to understand about Qwik at first is that code can be executed either client or server side (based on different logics).. In our specific case, we needed to execute the client-side check (where the JWT token session persists) and thus we used useVisibleTask$ to make sure that the client-side code was executed, after the first rendering of the component.
In fact, the useVisibleTask$() is similar to useTask$() but it only runs on the browser and after initial rendering.
There are still many features to be developed, and Erik (Frontend Developer) is added to the developer team to help us out with a couple of components.
A countdown that follows this logic:
In addition, the current event on the agenda and upcoming events are shown.
In order to speed up the development, we created a couple of reusable components: button, back to top button, company logo, back button, etc.
Deploying to Vercel is really straightforward with Qwik, in fact there is an adapter that you simply install with
npm run qwik add vercel-edge
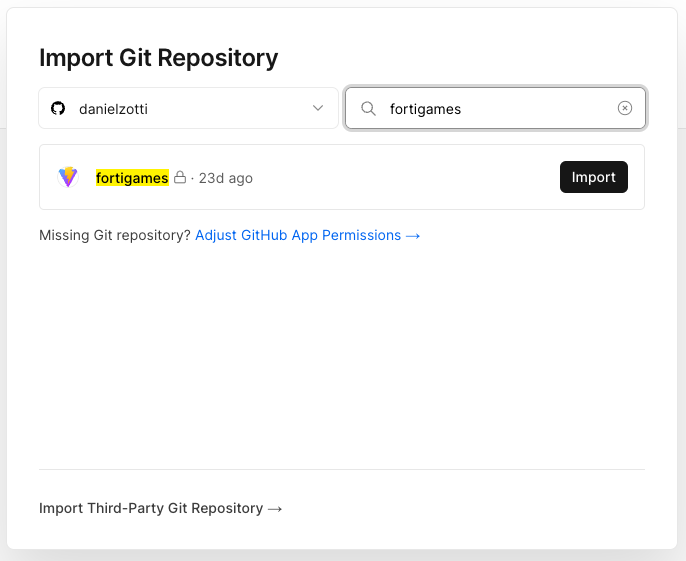
and then just go to the Vercel website and connect the Git repo
In addition, you can configure the project to automatically deploy on "push" on a specific branch (Settings → Git)
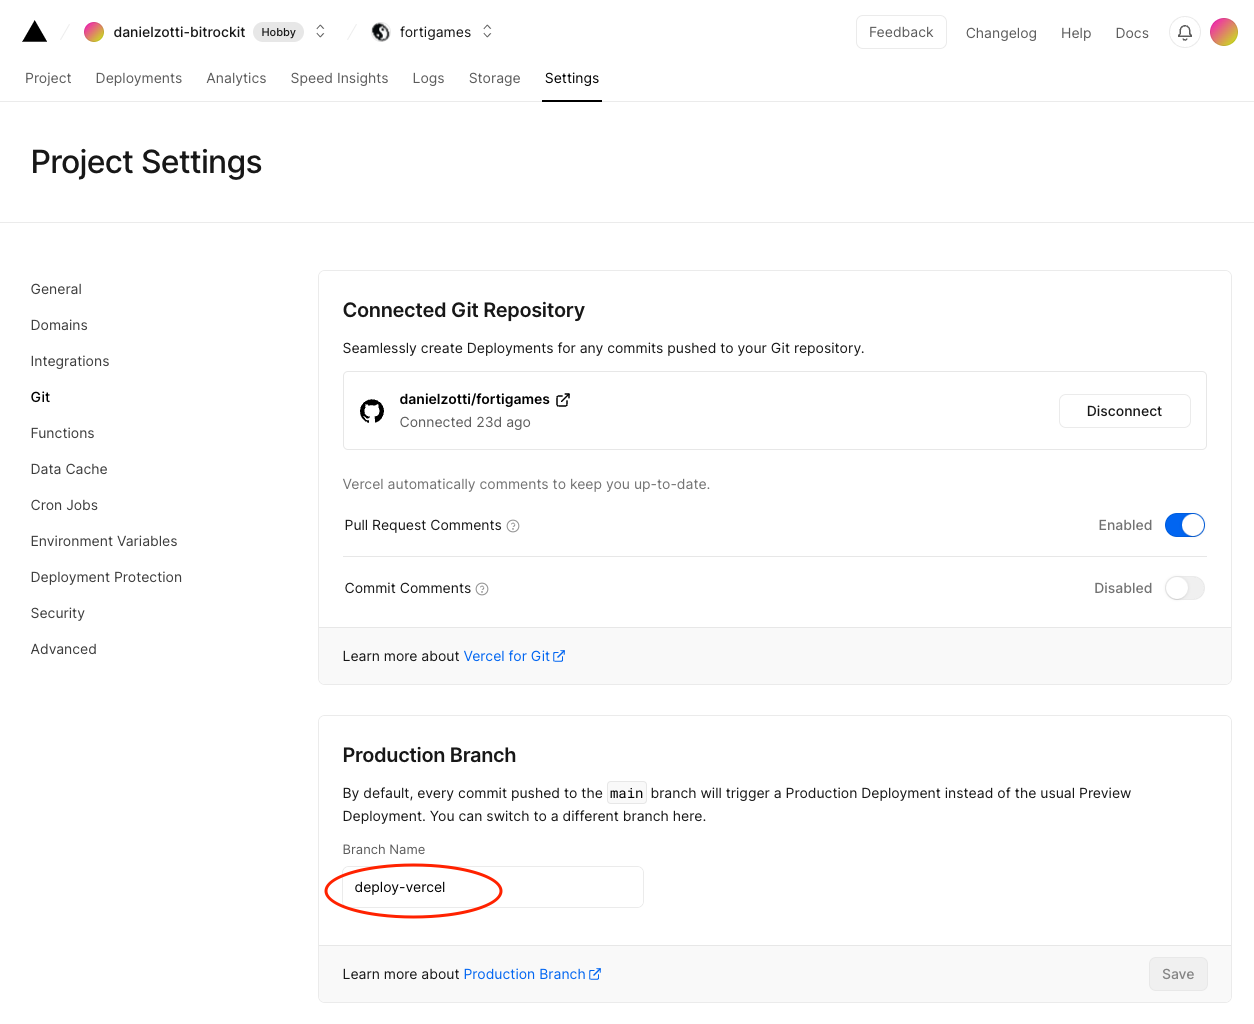
After pushing to the deploy-vercel branch just go to https://fortigames.vercel.app and see your app working.
The pattern for the URL is https://{project_name}.vercel.app
Supabase has the Realtime function and it is really easy to activate: just go to the table details, click on the button and you're done!
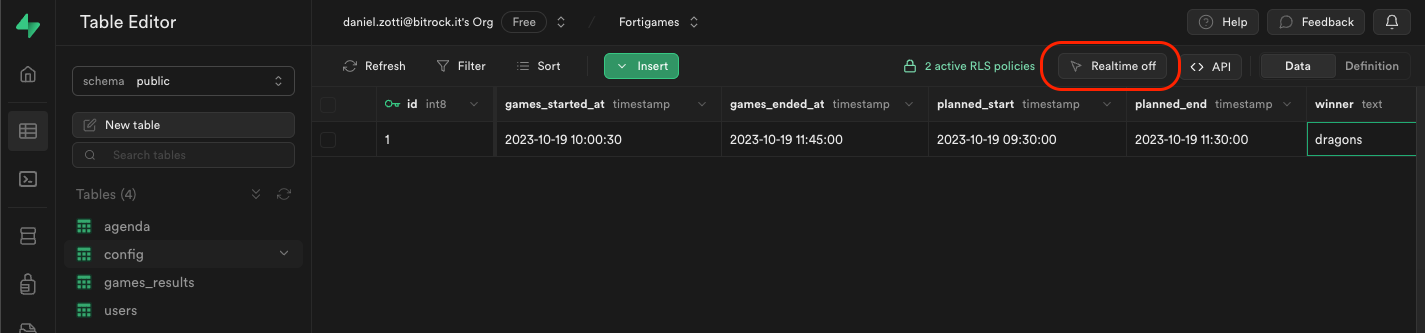
"Fun" fact: Stefano was in charge of studying the realtime part and, initially, he had activated that feature only for the users table. When I set out to develop the code for the realtime results, I lost 2 hours to realize that realtime had not been enabled on that table as well. In fact, Supabase does not return an error, but simply empties data so, with no error, it took me a while to figure it out (they could definitely improve this!!).
There is little data in the DB, and from a realtime perspective it makes sense to load the whole list of users (and all the other data) without thinking about pagination and just stay listening for the few data changes and update the data in memory accordingly. For convenience of use, we decided to wrap the logic in hooks.
NB: We will take useParticipants() hook as an example, but all the hooks are developed pretty much the same way (following the same pattern).
The idea is to initialize the hook's store data in the protected pages layout (since the application works only after authentication), so data is taken only once and, in any case, after authentication.
The single source of truth is our store, and from there we filter the data we are interested in, such as the list of users who participate in games (those who are associated with a team), or the list of people who play board games. We listen for realtime changes in the DB and update the store accordingly, and all other useComputed$ properties will update automatically.
// /src/hooks/useParticipants.ts

export const useParticipants = () => {
  // Single source of truth
  const store = useContext(ParticipantsContext);

  // List of all people in Fortitue Group who participate to the convention
  const usersList = useComputed$<Participant[]>(() => {
    return Object.values(store);
  });

  // Participants in a team
  const participantsList = useComputed$<Participant[]>(() => {
    return Object.values(store).filter((p) => !!p.team);
  });

  // People who play boardgames
  const boardgamersList = useComputed$<Participant[]>(() => {
    return Object.values(store).filter((u) => u.is_playing_boardgames);
  });

  // Get participant by a specifica email (ID)
  const participantByEmail = $((email: string) => store[email]);

  // It is used in the layout of the protected route
  const initializeContext = $(async () => {
    const { data } = await supabaseClient.from("users").select("*");

    // Save data in key:value structure (email is the key)
    if (data?.length) {
      Object.entries(data).forEach(([key, value]) => {
        store[value.email] = value;
      });
    }

    // Listen to data changes
    supabaseClient
      .channel("custom-update-channel")
      .on(
        "postgres_changes",
        { event: "UPDATE", schema: "public", table: "users" },
        (payload: RealtimePostgresUpdatePayload<Participant>) => {
          store[payload.new.email] = payload.new;
        },
      )
      .subscribe();
  });

  return {
    initializeContext,
    store,
    participantByEmail,
    participantsList,
    usersList,
    boardgamersList,
  };
};
Once the realtime feature is ready, we can work on updating the score of the matches. This is a fairly straightforward operation: just do "+1" or "-1" on the data when you click on the appropriate button (kind of like the classic "counter" example). One thing to keep in mind is to immediately disable the button after the user clicked, so as to avoid multiple updates.
// /src/routes/(protected)/games/[id]/index.tsx

const updateScore = $(
  async ({ team, score }: { team: 'dragons' | 'tigers'; score: number }) => {
    if (!result.value) {
      return;
    }
    if (score < 0) {
      return;
    }

    isSubmitting.value = true;
    try {
      const row = {
        ...result.value,
        last_update: new Date().toISOString(),
        [team]: score
      };
    } catch (ex) {
      alert('There was an error :(');
    } finally {
      isSubmitting.value = false;
    }
  }
);

<Button
  variant='selected'
  disabled={isSubmitting.value}
  onClick$={() =>
    updateScore({
      team: 'dragons',
      score: result.value!['dragons'] + 1
    })
  }
>
  +</Button>;
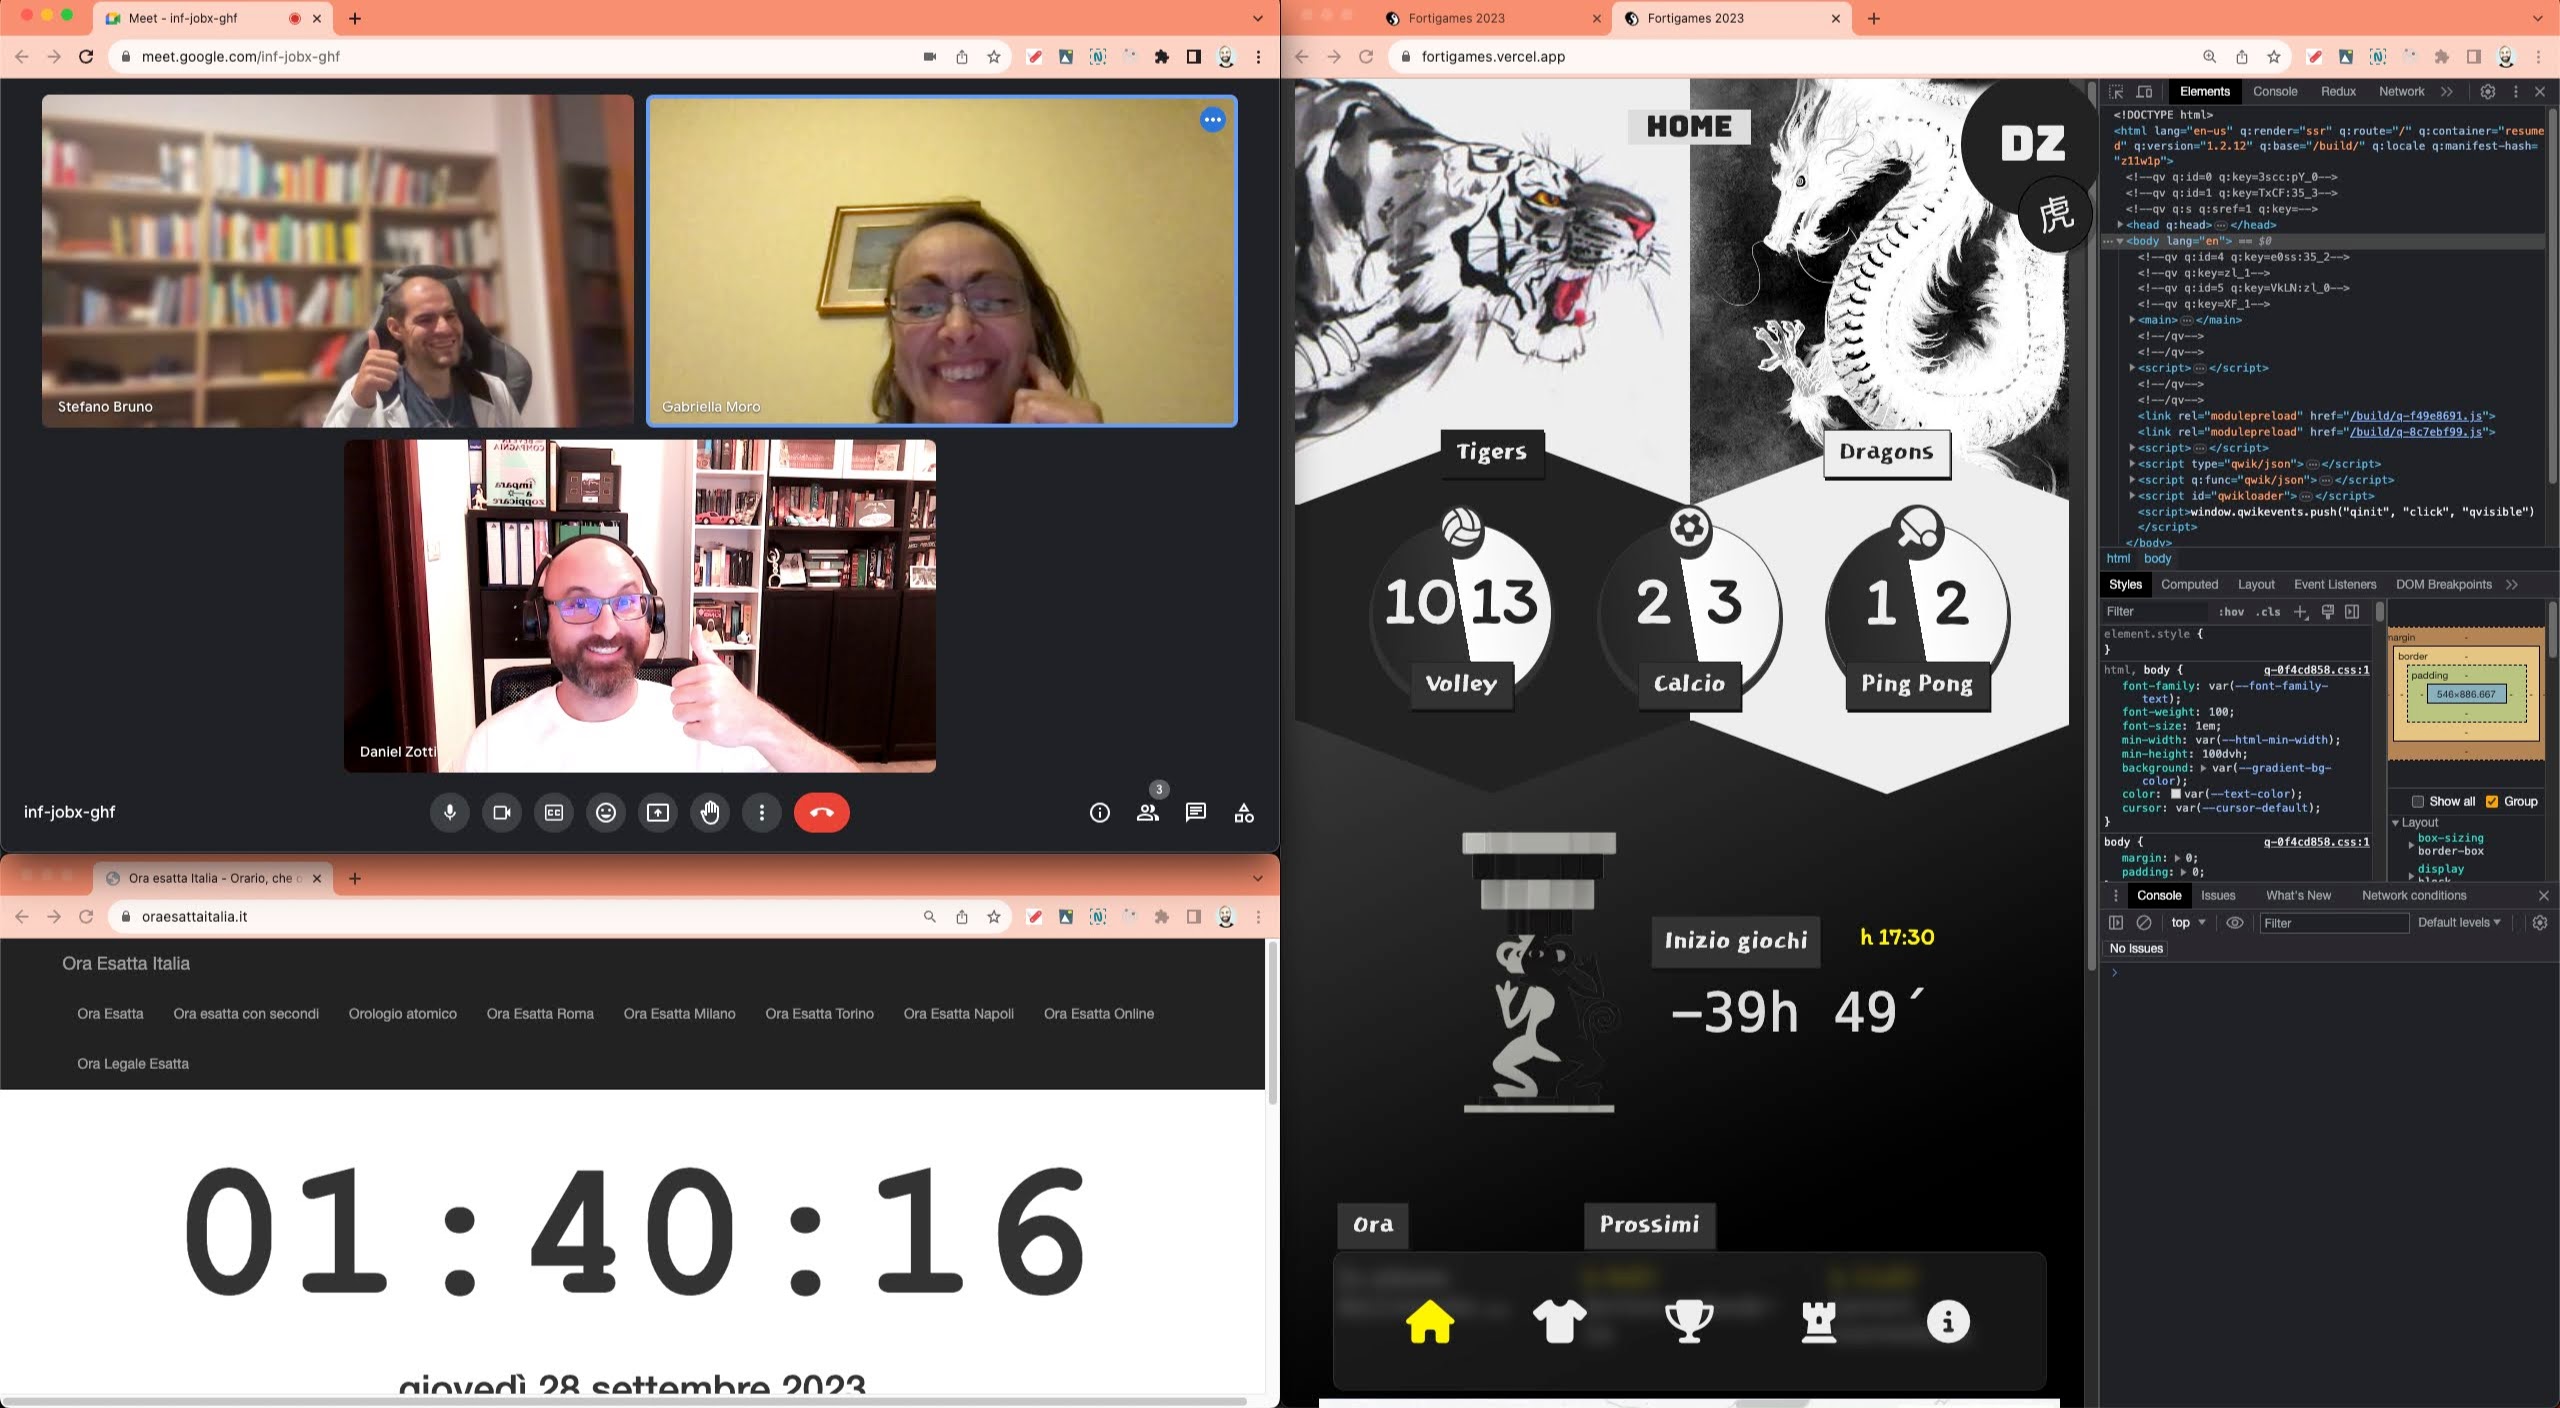
It's 1:40am. The app seems usable and (almost) complete. We can go to bed now, but first let's take a picture to celebrate!
In order to have something up and running on the day of the convention, we left the components for managing the games for last, since this could be handled by editing the DB directly anyway (from the Supabase website).
Fortunately, there was still a day to go, and by taking just a couple of hours off in the afternoon I was able to manage the buttons to start games, pause and restart them.
Each button has the same logic: it reads the status of the games in realtime and, when clicked, handles the specific Start/Stop/Reset operation of the games.
Graphics aside (an SVG of the cup drawn by Gabri), the component keeps listening to the winner field of the config table and, at the time it is set with the value "dragons" or "tigers", the component displays the trophy with the name of the winner.
It's 8pm of the day before the convention. The next day's departure is at 6am (and a 3-hour drive!) and the sleep backlog has to be made up somehow (going to bed every day at 2am was probably not a good idea 😅).
Just time for a few last graphical fixes, ZERO testing, and the last deployment is done hoping for good luck! Time to pack up and try to rest up for the two-day event!
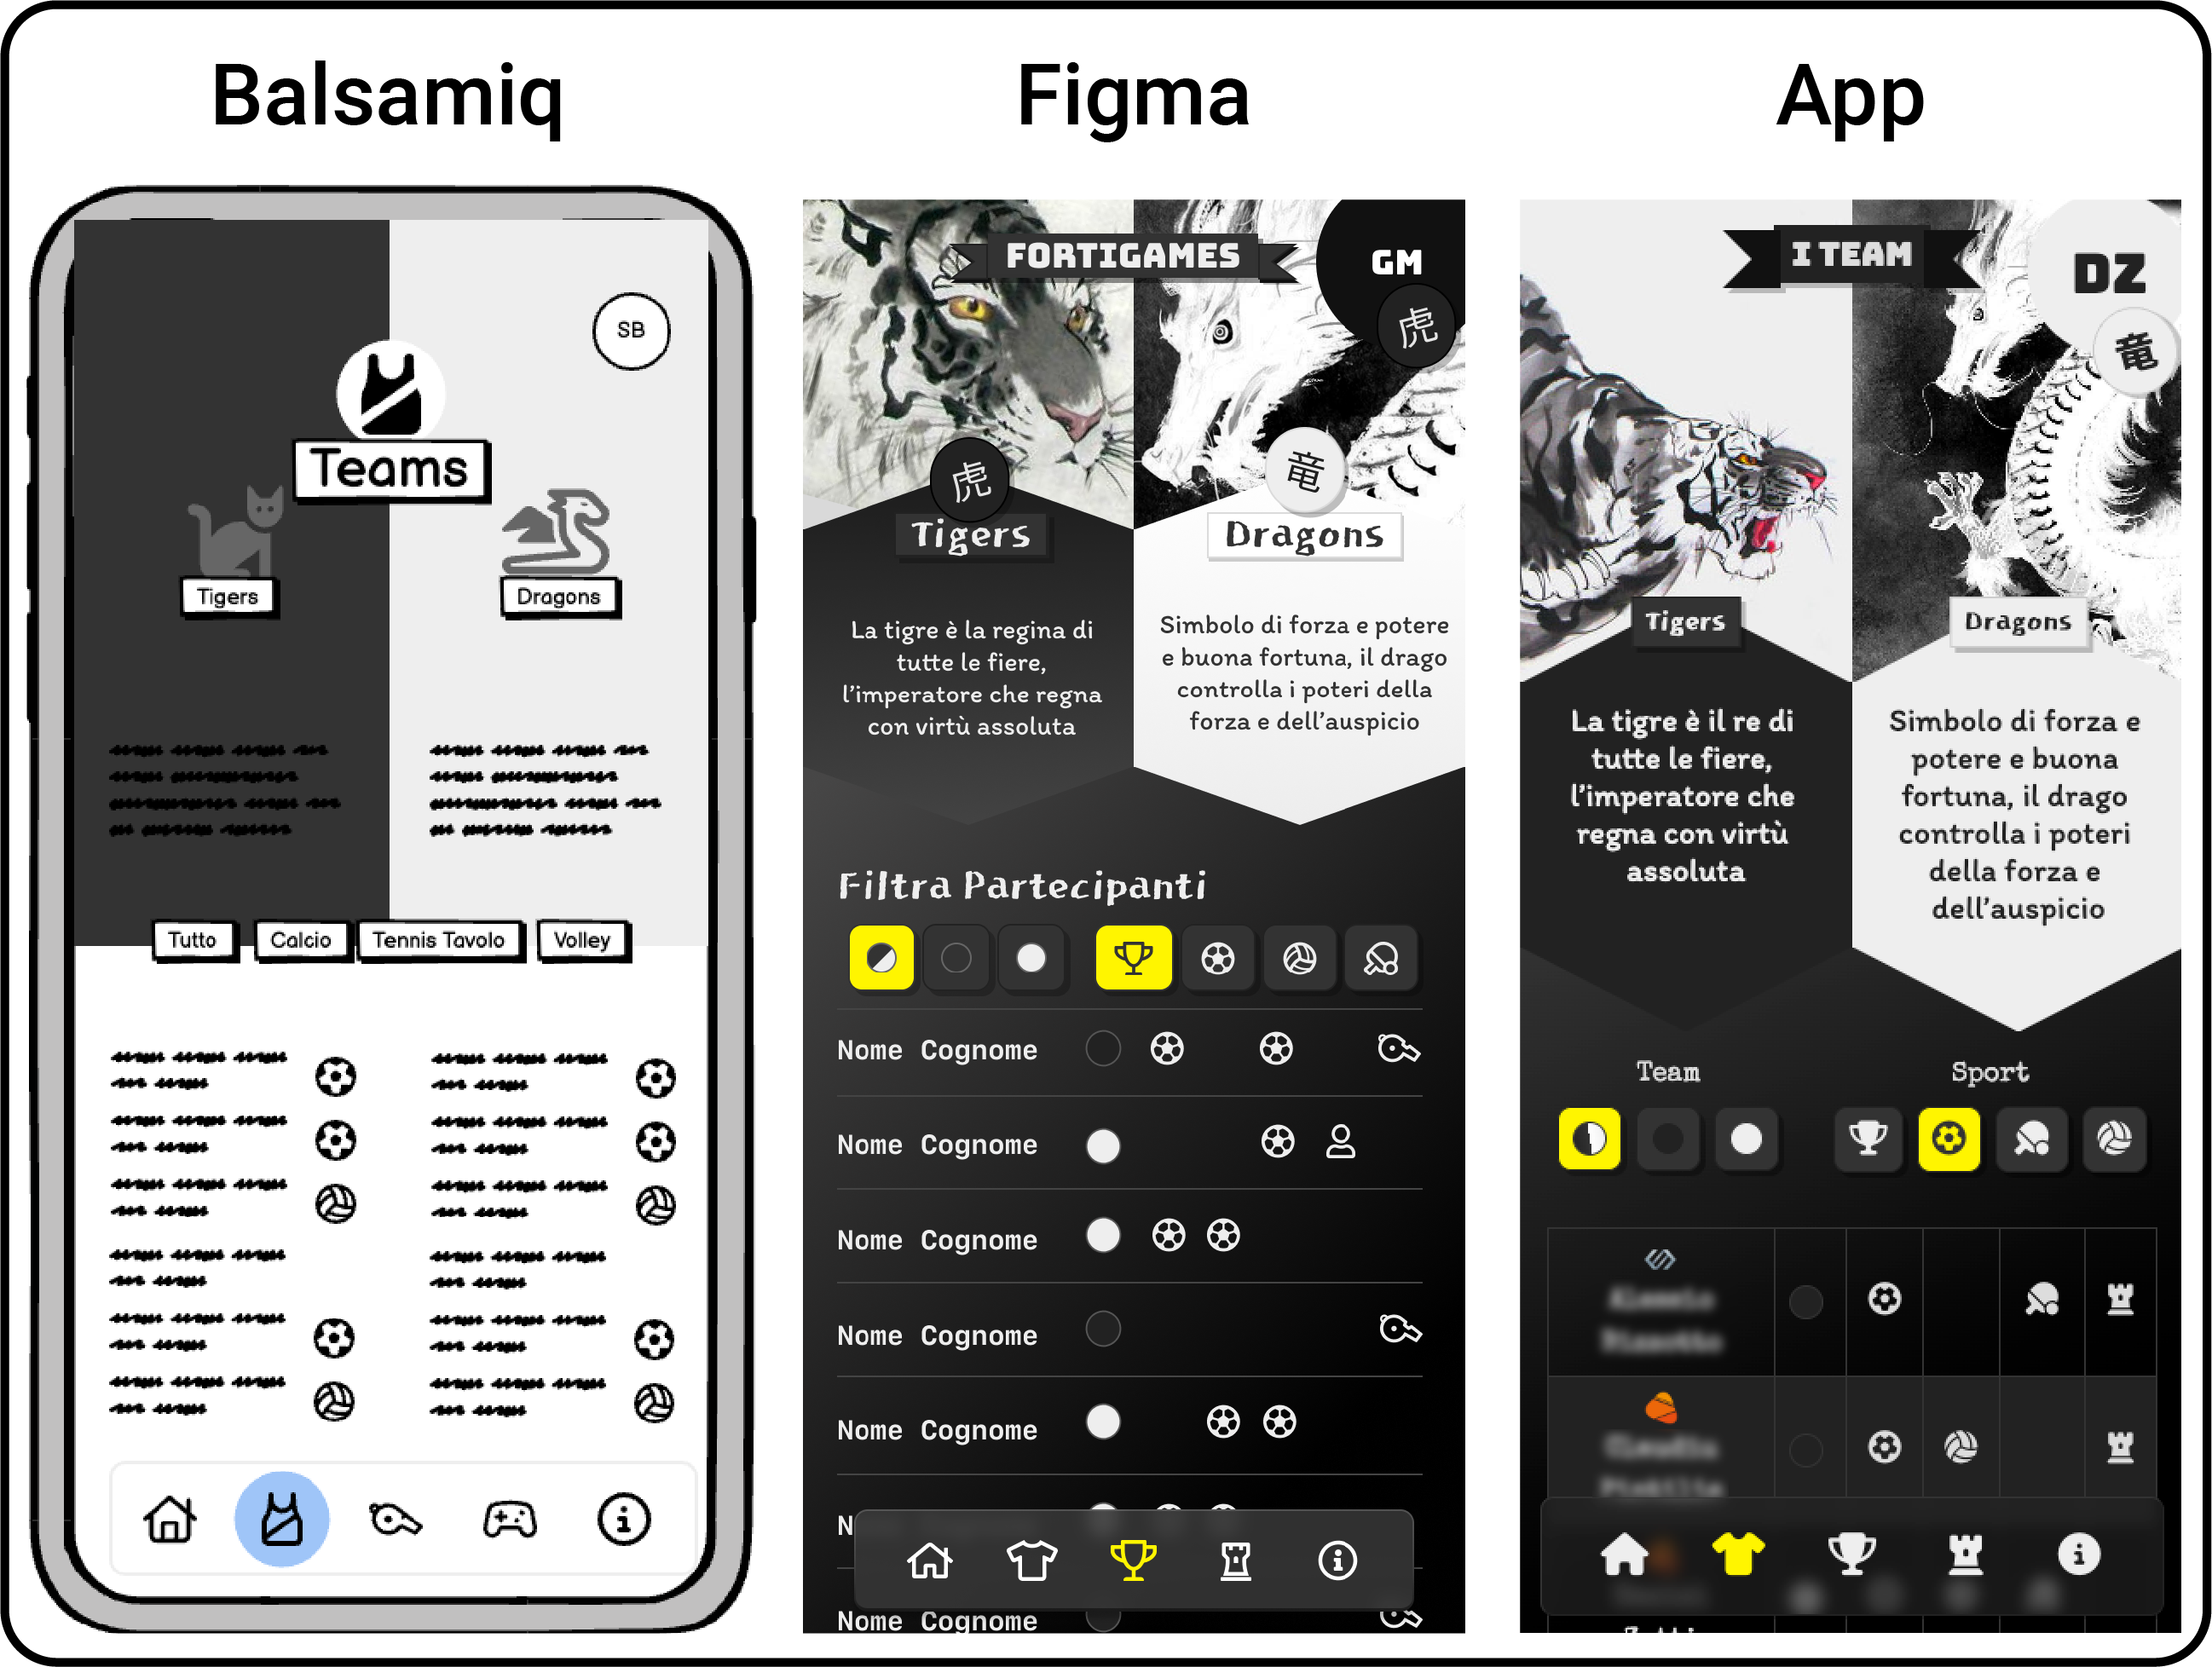
One last look at the evolution of the UI before concluding our journey:
Okay, the time was really short but we made it develop this app! Sure, adding ideas and features along the way was not a good idea, but in the end we did it and it was worth it.
I will never stop saying it, if you have fun and put passion into it you can do anything.
Let's take stock of the choices made:
Supabase has a nice dev experience and a really well written doc. On the other hand, realtime feature seemed a little slow compared to Firebase.
Overall we are happy with how it went, partly because we used both Qwik and Supabase for the first time and, in a few days, we were able to develop a working app with very little effort. These are two tools that we will keep in mind also for more complex projects, taking advantage of doing a deep dive to study them properly.
Of course there are certainly improvements that can be made. I don't know if we will do them but I’d like to list them:
config table directly from UII leave the link to the GitHub repo so you can browse through the code. If you want to try using the app you just need to use the repo code and follow the steps to create your own DB on Supabase and your own app on Google Cloud console.
You'll have to settle for a video, I'm sorry...
This was a very long post... I would say it took more time to write the article than the actual development work! 😅 I hope the tutorial is clear and useful for someone. And, as usual, if you have questions or you need more information about a specific part, don't hesitate to reach out! 🙃
❤️ Thanks for reading it! ❤️